Editor: Script Building
Editor: Script Building
The scripting panel allows you to compose scripts using test case objects drawn from Selector, specifying the ordering as well as the mode of use, whether sequential, conditional or loop. The scripting panel uses the blocks-based approach to scripting, letting you drag and drop test case objects, sections and maps , and then reorder and edit them.
When Alyvix Robot executes a script, it will interact with the web browser, other app, or even Windows itself, by following your script step by step, executing each test case object in the order indicated by the script.
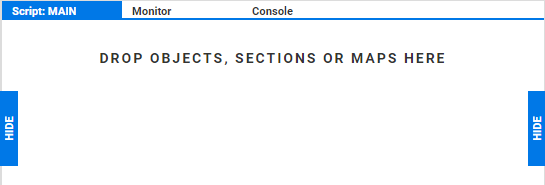
When Editor is first started with a new test case, there are no scripting nodes (elements that can appear in a script) yet, and thus the scripting panel is empty (the Monitor tab appears once a test case object has been created):

Adding Scripting Nodes
There are several methods you can use to create a new scripting node in the scripting panel:
Immediately insert a node at the bottom of the currently displayed script in the scripting panel with the
 action:
In Selector,
 adds the associated test case object as a new RUN scripting node.
Clicking on
 of a section will add it as a RUN expresion, while a map will
appear as a FOR scripting node.
Drag and Drop to any location in the scripting panel with the action:
Drag a test case object from Selector to create a new scripting node (see below) that appears as a RUN expression in light green, indicating this test case object will be executed when its script is invoked.
Drag a section or map into the script management panel. As above, a section or map will show up as a RUN or FOR expression respectively.
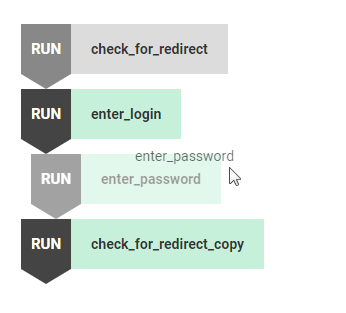
When you drag a test case object, section or map and hover over an available position, the mouse pointer will switch from the icon to showing the name of the test case object, moving other scripting nodes out of the way if necessary:

Multiple test case objects can be added with the above methods to create scripts as large as necessary for the task.
You can replace an existing test case object by dragging a new one directly above it. You can also select multiple scripting nodes as usual in Windows with the usual Ctrl and Shift key combinations.
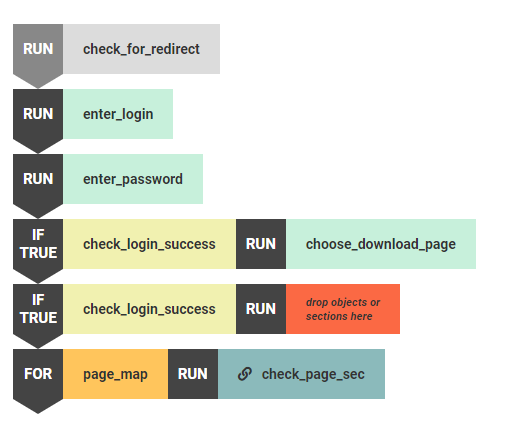
Two adjacent scripting nodes will be executed in sequence, with the lower node inheriting the state of the GUI that was modified by the node preceding it. So for instance in the script above, the RUNenter_login node would be executed before RUNcheck_login_success. The other types of scripting nodes are explained in the following section.
Script Expression Modes
There are four modes for scripting nodes that can be used in the scripting panel:
Sequential Run — Simply run the test case object corresponding to that scripting node, then continue to the next one. If there are no more nodes left, the execution phase stops.
RUN +
Object/SectionConditionally true — Run the test case object in the first (antecedent) node as normal (including any actions). If it had at least one group where all of the subcomponents in that group matched, then also run the second (consequent) node.
IF TRUE +
Object+ RUN +Object/SectionConditionally false — Run the test case object in the first (antecedent) node as normal (including any actions). If none of the groups matched, then also run the second (consequent) node.
IF FALSE +
Object+ RUN +Object/SectionNote that you should clear the Break flag on the antecedent, or else Alyvix will stop test case execution since that test case object failed, rather than continuing on to process the consequent.
Loop — For each item contained in a map, execute the specified scripting node once for each row in the map’s table. When run in CLI output mode, the measures for each iteration will appear in the output.
FOR +
Map Name+ RUN +Object/Section
Double-clicking on a scripting node’s mode will cycle it through the other modes in this order:
RUN > IF TRUE > IF FALSE > RUN
Note that double-clicking on the FOR mode won’t change it since it’s based on a map rather than a test case object.
Scripting Node Colors
Each color used for the scripting nodes has a particular meaning. The following screenshot illustrates an example script, where each color is explained in the table below.

Color |
Description |
Gray |
A disabled test case object of any mode |
Light Green |
An enabled test case object pulled from Selector |
Yellow |
An enabled test case object from Selector serving as an antecedent |
Red |
An unspecified scripting element serving as a consequent |
Orange |
An enabled map element within a FOR scripting node |
Dark green |
An enabled Section script (subroutine) — Clicking on the “link” icon will switch to the scripting panel for that Section |
Scripting Node Actions
The two buttons at the bottom of the scripting panel work as follows:
: Toggle whether a scripting node is enabled or disabled. Disabling allows you to temporarily switch off a given node without having to delete it and later re-add it, which may be useful for example when debugging scripts.
: Immediately execute the set of scripting nodes selected with the mouse, which again can be useful when debugging scripts.
: Delete a scripting node.