NetEye 4 Integration
NetEye 4 Integration
Alyvix Service fully integrates with NetEye 4 via the Alyvix Service API, allowing you to incorporate your Alyvix Nodes into your monitoring network just as if they were any other server, and see the results of your Alyvix runs in the standard NetEye 4 dashboards.
This quick guide will help you understand the steps needed to configure NetEye 4 and links to the relevant sections of the NetEye 4 documentation to help you get the most out of Alyvix Service and Alyvix Core.
It assumes that you’ve already correctly installed and configured Alyvix Service as well as satisfied the NetEye requirements. As part of that process, you will have already obtained security certificates (HTTPS/TLS and JWT) from your NetEye 4 installation, have restarted Alyvix Service on Windows via Computer Management, and have understood and chosen the appropriate NetEye architecture.
Please note you can also watch a video version of this configuration guide.
Configuration Steps
Add tenants if in a multi-tenant environment
If you’re not familiar with how NetEye tenancy works, please read the conceptual documentation for tenancy types specific to the Alyvix module in NetEye. Once you’ve decided on the best tenancy type for your situation, you can then find more technical information here.
When ready you can create and configure one or more tenants using this command:
neteye tenant config create <tenant_name> [options]
Install the Alyvix Module in Director
Follow the installation procedure for NetEye Additional Components in the NetEye user guide for the Feature Module Alyvix ( neteye-alyvix). Once it completes, you’ll need to refresh your browser window, then log out of NetEye and log back in to ensure the necessary permissions are updated.
Configuring an Alyvix Node in Director
Each computer that runs Alyvix Service along with one or more Alyvix test cases is called an Alyvix Node. From our point of view, a Node is simply a dedicated machine running Alyvix Service and one or more Alyvix test cases.
From the point of view of NetEye 4, each Alyvix Node is a Host that must be registered in Director just like any other server. Thus within NetEye you will need to configure (and deploy) at least the Node’s (case sensitive) host name, type, IP address, and tenancy type, which is used to ensure NetEye users are only allowed to see data they are authorized to see.
Based on your chosen tenancy type, copy the appropriate role mapping from the NetEye User Guide and save it on each Alyvix Node as the file
C:\ProgramData\Alyvix\mapping.json(with the required modifications in the case of the Tenant-Specific architecture).Configuring an Alyvix Node in the Alyvix Module
Once you’ve deployed those changes, follow the NetEye user guide instructions to activate the new Node. This consists of:
Installing your Alyvix license on each Node
Adding one or more sessions to each Alyvix Node
If you selected the tenant_shared architecture, select the tenant to whom this particular session belongs
If directed to do so by the Add Session panel, open a shell on the NetEye Master node and run the neteye command as described in the message below the tenancy field, as in this example:
In order to complete the setup of the connection with the Alyvix node, please execute the
neteye alyvix-node setup <node-name>setup command. For more information please consult our User Guide.
Adding one or more test cases to each session
Enabling the test cases and sessions to run at regular intervals
Check that data for an individual test case is available
Once your Alyvix sessions are up and running, you’ll want to check that they’re working correctly. Because it takes time to schedule and run Alyvix test cases, results in the form of success/failure and timing results may only be available after a few minutes.
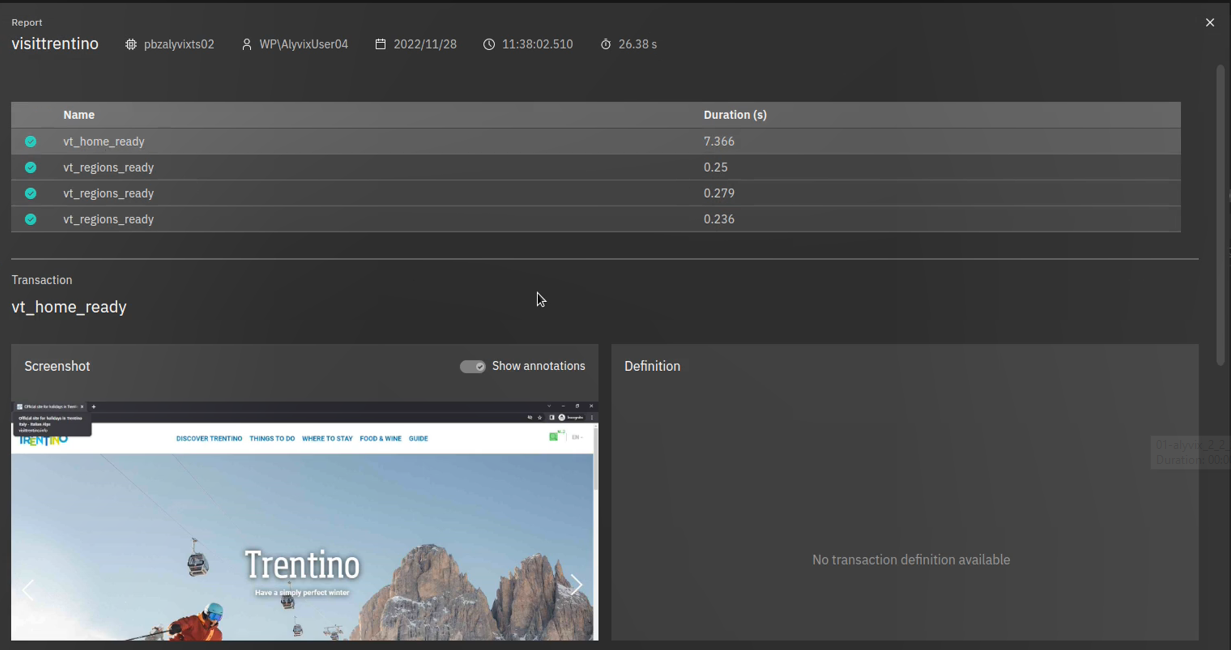
Once each test case completes, Alyvix also creates a report which you can see inside NetEye. Each report contains both timing data and output screenshots (both expected and actual in the case of a failed test case run).
After a few minutes, go to the Reports tab and select a test case run from the list. If the screenshots are visible and look as you expected, and the timing data is present, then you have correctly completed the Alyvix/NetEye integration and configuration.
View historical data in the ITOA module
You can now view the first recorded data points in NetEye’s ITOA module as described in the NetEye documentation. Note that a tenant is called an Organization in the ITOA module.